Friday, March 17, 2017

LIGHTING UP YOUR APPLIQUE

I love to do applique using my Embroidery machine, but I especially like doing applique when I can cut the objects out with my Brother Scan N Cut.  You get clean cuts....it's just great.

HOWEVER..... trying to place those pieces on to your hoop accurately so that the tackdown stitches catches all of the edges and ultimately be covered by the satin stitches or bean stitch (If that is what you are using) for your finished stitching THIS CAN BE TRICKY.

BUT  - I found a solution.  I was cleaning out my sewing room closet for an upcoming garage sale and I found a light box that I bought ages and ages ago.  Mine is by Artograph called a Light Tracer. It has a screen that is 10 x 12 inches.  I bought it a long time ago, but I am sure I bought it at Michael's or Hobby Lobby with a 40% off coupon.

My idea was what if I could place my hoop on to the light box, turn the light on and then be able to see where to place my applique piece ACCURATELY!  Because the light would shine through....my fingers were crossed.

And you know what?  IT WORKED.  It work even on dark fabric.  I was able to place my applique piece on my hoop making sure the tackdown stitches would be caught on all edges.  It also insured that my bean stitch would catch as well.

In the example I am showing below I did not use a satin stitch and I inflated my cut file 3mm.  Its the look that I wanted to achieve on this quilt.

For a satin stitch finish I usually inflate my cut files about 1.2 to 1.5mm.....more often 1.2mm

But this method would work for placing applique pieces when using a satin stitch as well.


When I placed that shell piece over the applique position stitches I could see through the green fabric and was able to accurately place it on the hoop.

As you can see, I was able to stitch the tackdown stitches and catch all of the material.
This isn't rocket science, but I have 164 more of those blocks to do and this is going to be a lifesaver in placing my applique pieces.

Just wanted to share my light bulb, or should I say Light Tracer moment.

Happy Embroidering!


Wednesday, March 8, 2017

Using the Flatten Tool in Stitch Artist Level 3

Even if you have been using Stitch Artist for awhile, its always good to go back to the videos that Brian created on the Controls for Stitch Artist Level 3.  I spent the morning doing just that and wanted to write a post so that I wouldn't forget this technique.

I use Stitch Artist by Embrilliance for digitizing embroidery. Its one of the most user friendly programs and there are many many Stitch Artist Videos to help you get started.  The online PDF manual is full of great instruction.

When I started using Stitch Artist, I just wanted to make something. So I decided to make a basic bear using the circles shapes for the object library:


The problem is (as you can see from the picture of the object pane) there is all these fill stitches under the ears.....How to eliminate the without redrawing my objects.  That's where the tool "Flatten the Object, remove the overlaps" button comes in handy.


I selected both ears and the head in the object pane and then clicked the Flatten the Object, removing the overlaps button.  The result is 3 objects....the head object has cutouts where the ears overlapped. 


You will noticed that the fill is gone on the head object.  Just click the fill button on the stitch property menu and the fill will reappear.  Now you can go back and adjust your stitch, inclination, and compensation properties so that there is no gaps in between your fills. You don't want all your fills to have the same inclination.

This tool also comes in handy if you have overlapping vector shapes and you want to remove the stitches under the overlapping parts.  Select all and click Flatten the Objects, removing the overlaps.


Again, just click the fill button on the stitch property menu for the fill to reappear on the other objects.  

This such a cool feature.  Happy Digitizing!


Monday, March 6, 2017

Creating Quilt Blocks using Contour Fill - Stitch Artist Level 2 or 3

I decided I wanted to make a quilt....and I wanted to be able to create my design and quilt with batting on my embroidery machine.  My quilt will have 4 different designs....basic outlines of a Fish, Sea Turtle, Shell and Sea Horse.  For this blog post, I will be using the Sea Horse.  I discovered a great way to use the contour fill option on Stitch Artist 2 or 3 and thought I would share.

I use Stitch Artist by Embrilliance for digitizing embroidery. Its one of the most user friendly programs and there are many many Stitch Artist Videos to help you get started.  The online PDF manual is full of great instruction.

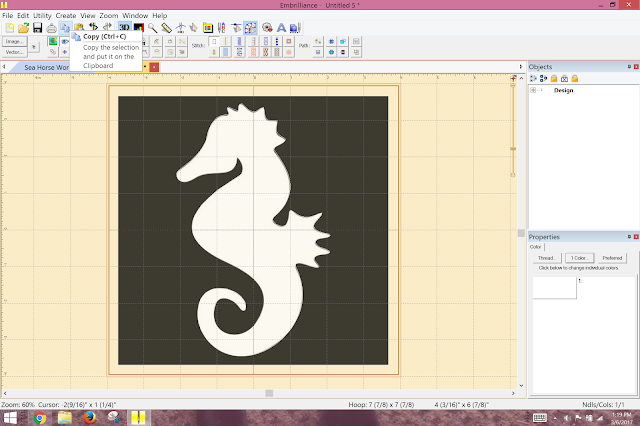
I am using a 8 x 8 hoop on my Brother Embroidery Machine.  I googled and found a Sea Horse silhouette that I liked to use:


I used the magic wand to create my outline of the sea horse and I assigned a run stitch.  As you can see I set the Sensitivity of the magic wand to 225.  I find you get less nodes if you increase the sensitivity number.  Good rule:  Less nodes gives you smoother designs.


I then hide my image, as it is distracting when making the rest of my quilt block.  I want my sea horse object to be 6 7/8"....so I adjust my object accordingly.

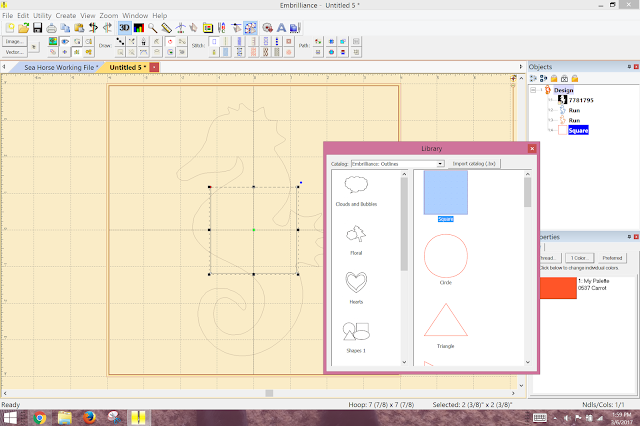
I then copied and paste another sea horse because I will be using it later to create the contour of the block.  I then go to the object library and add a square.


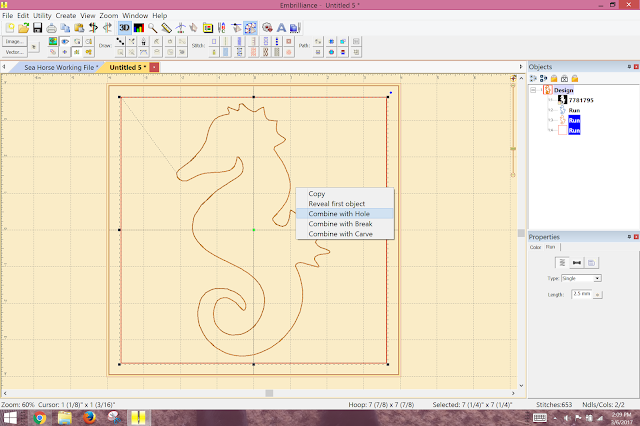
I change the size of the square to 7 1/4".  I assign a run stitch to the square.  Then I select the sea horse run and the square, right click and select Combine With Hole:


With the new combined object selected, I then go to the stitch selection menu and selection Contour Fill:


You get stitches that look like this below....too many for a quilt block but you can change that.  You want Contour Echo Outline Inward....because you are going inward from the square, not outward from the sea horse.


I changed my offset to 8.0mm:


You will noticed that the contour shape is now 6 7/8" by 6 7/8" instead of 7 1/4".  I am not 
sure why this does this but I will take care of that later...in the last step.

I decided that I needed some quilting stitching inside the sea horse to give it some dimension.  I copied and pasted the sea horse object.  I then again, selected the Contour Fill Echo Outline Inward with the 9.6mm offset.


I make one more copy of the sea horse and add it to my object pane.  You will see why for the I do this in the last step.

I am now go back and make the first the sea horse in the object pane an applique....so I change it in the object pane from a run to an applique with a position and tackdown stitches. I use the fabric preview to show the fabric.


My quilt block is 8 x 8....so I go to the object library and add another square, this time making it 7 1/4" by 7 1/4".  I assign it a run stitch.  I then select this square and the sea horse above it and right click, and select Combine With Hole.


And there is my block.  I suppose I could just have added the square at the end without adding the sea horse outline, but I want the sea horse to stand out.  

I then go back and adjust my stops and starts and my stitch lengths.  I also decide which will be a single run and which will be a bean stitch.  

This was such a great discovery and I am thrilled with my outcome.  I repeated these steps for my other shapes....the shell needing a little more digitizing than the magic wand...but that's another tale to tell.

Hope this helps you.

Tuesday, February 21, 2017

Making Stippling Around an Existing Embroidery File

We all have a boat load of designs on our computers that we would love to make in a quilt or pillow.  Wouldn't it be nice to be able to add stippling around those designs using digitizing.

I use Stitch Artist by Embrilliance for digitizing embroidery. Its one of the most user friendly programs and there are many many Stitch Artist Videos to help you get started.  The online PDF manual is full of great instruction.

I am using a 8 x 8 hoop on my Brother Embroidery Machine.  Here is my existing design from Amazing Embroidery.  I open the object pane.


I am using Stitch Artist 3.  I will explain using Stitch Artist 1 below.  
Select the outline of the design.

I then select Create an outline from stitches on the page icon:

With the object still selected click the next icon - Inflate outline.  Make sure you click Remove Holes. I used 4mm for my inflation.  

IF YOU HAVE STITCH ARTIST 1, you must draw your own outline using draw with points. Obviously, you will want to move the nodes til you get the shape around your object the way you want it to be:

For all levels of Stitch Artist you then go to the shapes library and add a box.  

My box is 7.25" x 7.25"

I then select the outline and the box I have created.  I go up to Create and I select Outline and then select COMBINE HOLE.

With the new design still selected I click the stipple icon

Then you can adjust the stippling as you would like:

If you just want to create an outline of your existing embroidery design, you can also use Enthusiast by Embrillance.  With the use of knockdown stitches, you can make the outline of existing embroidery.  Here is my existing design from Amazing Embroidery.  I open the object pane and select the design.

With the object selected in the object pane go up to Utility and select Add Knockdown Stitching:

And this is what it will look like:

With the knockdown stitches selected in the object pane, open Stitch Artist by selecting Create.  Then select run stitch from the stitch selection.  The knockdown stitches will change to a run stitch around your embroidery design.


Have a good day!


Friday, February 10, 2017

Stitch Artist - Creating an Outline using Two Objects

Sometimes you want your object to have an outline maybe wider than a regular satin stitch or maybe you want that object to have smoother 0r sharper points.  I tried to figure this out....but Harper and Brian at Embrilliance came to the rescue and showed me a very good method.

I use Stitch Artist by Embrilliance for digitizing embroidery.  Its one of the most user friendly programs and there are many many Stitch Artist Videos to help you get started.  The online PDF manual is full of great instruction.

I used a star for my example.  I open Stitch Artist (Create) and select the Design Icon.  I selected the 5 point star (First one).  I copied the star so now I have 2 stars in my object pane. I reduced the size of second star.


I then centered both stars.


I then select both stars and right click on the objects on the screen.  When you right click on objects, a popup menu appears.  Select Combine With Hole.


Once you do this your object pane will show one object:


Select a node from each star....I did mine on the bottom:


Right click on one of the nodes and a pop up menu appears.  Select Connect to Hole.


Now they are connected.  The photo below, I have pulled them apart just temporarily so you can see where they are connected.  


Now you can add your stitching.  I selected satin column and then added inclinations to sharpen the stitches at the points.  


You can move the nodes to widen the satin stitch....


Works with rectangles, circles....  Again, a big thank you to Harper and Brian at Embrilliance for helping me with this.


Wednesday, February 1, 2017

FINDING LINE ART DRAWINGS FOR DIGITIZING

I made a great discovery and thought I would share it with you. I have been learning Inkscape in order to make SVG files (Vector images) to use in Stitch Artist. I use Stitch Artist by Embrilliance for digitizing embroidery.  Its one of the most user friendly programs and there are many many Stitch Artist Videos to help you get started.  The online PDF manual is full of great instruction.

Inkscape is a vector graphics editor for Windows and Mac which is free to download.

While doing an Inkscape tutorial by Chevee Todd, the instructor showed how to find Line Art Drawings with a Google Search. Line Art Drawings would be perfect for digitizing.

Remember , many of these images are not FREE...and must be purchased from the author of the image. Also, many images are for personal use ONLY and not for resale. Make sure to read licensing agreements.

This is the one that I found.....and will explain how I found it.


To search for the image, I went to my Google search engine and typed in what I was looking for.  In this case, Labrador.  Once the search came up, I then clicked Images:


As you ca see, it comes up with loads of Labradors...but no Line Art Drawings....but they are cute, aren't they? 😍  To get the Line Art Drawings, but must click Tools. 


Once you click Tools, another row of options appears.  Click Type and then Click Line Drawing.  


And pages and pages of line art drawings appear.  And there is my image. Remember....check the licensing agreement of these images.  This has been a great discovery for me. 

Happy digitizing and embroidering! 💗💖💕


Thursday, January 19, 2017

FABRIC PIECING BY DIGITIZING - Part 2

As part of Part 2,  I will be explaining my fabric piecing technique further. This Black Labrador piece is my dog,  Maybelle.  We got her from a rescue in June and she is almost 10 months old here.  She had a rough start in life, but we are happy to say she is a loving, sweet girl.

This is my second attempt at fabric piecing by digitizing and it been a great learning experience.  In Fabric Piecing by Digitizing - Part 1, I roughed out the basic design.  The eyes I covered in  another blog post called Look into a Dog's Eye.  In Part 2 I tweaked the design and refined it so it was ready for stitching.

I am using Stitch Artist by Embrilliance for digitizing.  Its one of the most user friendly programs and there are many many Stitch Artist Videos to help you get started.  The online PDF manual is full of great instruction.

For my fabric piecing project I used Stitch Artist Level 1. The whole project is done in applique pieces (except the eyes, collar hardware & tag and highlighting details)   Stitch Artist Level 1, Controls Part 3, Applique video is a good reference in working with applique.

The picture on the left is the one I used for my design.  The picture on the right is the design that I stitched out

And here is my working file in Stitch Artist:


Maybelle is a very very black dog....and the picture doesn't exactly have all the shading that I added to this design.

All the applique pieces are set at a ZigZag at 3.2mm.  I started with 2mm and it was too small and for me, it  left too many ragged edges. I find that the ZigZag stitch looks larger on the screen than it actually is when you stitch it out on fabric.  

Face:  Maybelle has a very black face....  When I lightened up the picture a bit, I could see light on her cheekbones and shadows underneath her eyes.  The light on the cheekbones I used lighter applique pieces.  For the shadows under the eyes I used a satin border with pointed ends, density set at 6.9 pt and width of stitch 2mm.

Ears:  I added more texture to the ears to give them more dimension.  Her big ears aren't flat, they have some curves to them.  Adding the applique pieces gives them the curve they need to look more realistic. 

Muzzle and nose:  On the stitch out, the nose came out a little rounder than I would like...but the idea was to see the reflection of the light on her muzzle and nose.  I added fill stitches to the muzzle instead of fabric because I wanted it to be more subtle.  On the fill I used no underlay, inclination at a 45 degree angle.  The stitch density is at 12 pt., I did not travel the edge.  I also feathered on both sides 32%.  

Body:  Here I didn't really follow the picture but made pieces and moved them around til I achieved the results I wanted.  Their fur has a lot of movement....even in a very black dog.  I looked at other paper piecing pictures and tweaked this quit a bit from my original rough design in Part 1.  I looked at a lot of other Black Labradors to see how their fur lies....and adjusted my design accordingly.  

Collar and Tag:  The collar itself is just an applique like the rest of the pieces with a bean stitch run to show definition on the collar.  The tag is a fill using density at 4 pt, pattern Corn Row 2.  The metal pieces are all done in satin stitches, 4 pt, except the tag ring which is a bean stitch.  

Here are some pictures of the stitching process:


I think I made Maybelle too dark...but I think it looks a lot like her.  I am pleased with the results. Here is a larger version of the completed design.  Its at is original size which is 7 inches by 10 inches. On this larger version you can see better the detail of the stitch out.


Thanks goes to Brian, Lisa and everyone at Embrilliance who have been extremely helpful as I learn Stitch Artist.  Also thank you to Jeannie and her blog, Nonna's Scraps.  Her explanation of techniques is outstanding and I refer to her blog often.  Also to Nadia and her blog, With Glittering Eyes.  This lady is so talented and her blog is filled with great ideas and techniques.